|
|||||||
| مجلة العلوم الهندسية الهندسة , المعمارية, الميكانيكية, الكهربائية, الانشائية. برامج هندسية, مشاريع, تقارير, أبحاث |
 |
|
|
LinkBack | أدوات الموضوع | انواع عرض الموضوع |
|
#1
 January 1, 2011, 02:53 PM
|
||
|
|
||
|
CORDED HAMMER DRILLS Corded Hammer Drills have a wide range of uses. Corded drills are powered directly by plugging into the main electricity supply and this means that extra care must taken regarding safety. 1. The cord is carefully laid out so that it cannot trip the person using the drill. 2. It is good practice to use a circuit breaker. This will cut power if any electrical fault in the drill occurs. 3. Always wear safety goggles to protect the eyes. Never operate equipment like this without eye protection.  4. When using a corded drill hold both the normal handle and front handle securely. This will help steady the drill as it vibrates during use. It also allows the user to put pressure against the drill as it is used to drill holes in difficult materials. 5. The person using the drill should space their feet apart. This helps the person balance and lean into the drill, applying his/her weight safely. 6. Always check that electrical wires or water pipes are not in the area of intended drilling. Drilling through an electrical wire can be extremely dangerous. 7. Always seek instruction / training from an appropriately qualified instructor before using any tools, especially power tools. A basic corded drill is shown below. Even basic drills are provided with accessories. For instance, corded drills usually have a front handle that can be fitted if required. It is strongly recommended that the front handle is fitted as it provides extra support an makes it more likely that the drill will be used safely. If both hands are holding the drill then it is impossible for the user to accidentally place his /her hand in the way of the drill whilst it is in use. 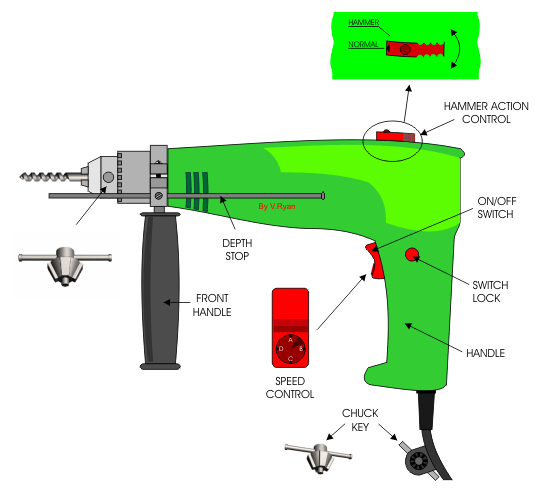 The drill speed (rpm, revolutions per minute) can be changed according to the material being drilled. On the example shown above the speed is changed by turning the dial on the on/off switch. This will vary depending on the model of drill being used. 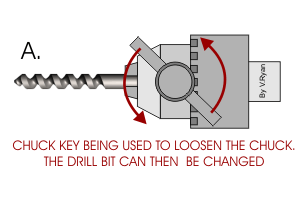 A. The drill bit is changed by using a chuck key to loosen the chuck. The bit is normally changed if a larger diameter is needed OR a different type of drill bit. For example, a normal HSS drill bit is use to drill wood / ****ls. However, for masonry and brick / stone a ‘masonry’ bit is required. 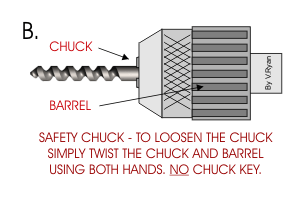 B. Safety / self-locking chucks are very common. These do not need a chuck key and are used by simply turning the chuck and the barrel by hand, in opposite directions. The drill bit locks in position. Most corded drills will have at least two basic settings - normal and hammer. This allows the drill to be used on a range of materials such as natural woods, manmade boards, ****ls, masonry, brick and stone. 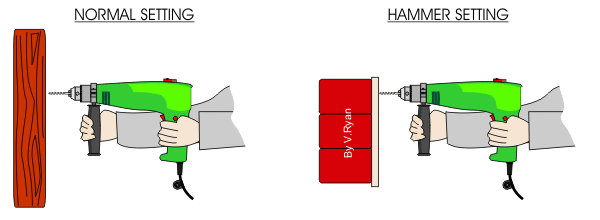 When drilling materials such as natural woods and manmade boards the ‘normal’ setting is correct. When this setting is used the drill bit rotates in a clockwise direction cutting into the wood. ****ls are drilled with the same setting. When drilling materials such as masonry and brick the ‘hammer’ setting is correct. When this setting is used the drill bit rotates in a clockwise direction but is also driven backwards and forward into the material at great speed. The drill vibrates as it is ‘hammered’ through the material. TIP When drilling a difficult material such as stone. Fit a masonry drill bit and start drilling on a normal setting. Once a small hole has been started, switch to the ‘hammer’ setting. If the ‘hammer’ setting is used right at the beginning, the drill bit can slip as it vibrates at high speed BASIC ACCESSORIES AND DRILL BITS DRILL STANDS Accessories such as rill stands can be used to clamp a drill in position so that it can be used like a machine drill. Stands such as these are fine for light work but for heavier work it is recommended that a Machine Drill / Bench Drill is used. A drill stand is normally used when storage space is limited. However, if there is enough bench top room buy a bench drill as it is safer and it can be used for a wider variety of drilling. Drill stands are usually supplied without guards or machine vices. This inevitably means that they are not as safe. 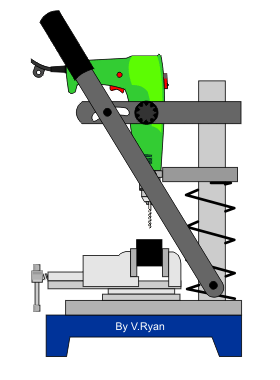 COMMON DRILL BITS Good quality drill bits are manufactured from High Speed Steel (HSS). This type of steel keeps its sharp edge for along time and is capable of cutting through extremely resistant materials. Do not buy cheap carbon steel bits as they are a false economy. They will wear quickly an will not cut through resistant materials 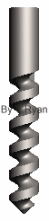 Twist drills come a range of sizes. the more common sets of twist drill range from 1mm to 10mm in diameter. When drilling the larger diameters it is wise to drill a smaller ‘pilot’ hole first and then increase the diameter of the hole by drilling with a larger size. When drilling ****ls, use a lubricant such as oil. This will cool the drill bit as it cuts and lubricate the surface of the drill bit against the surface of the material being cut.  Masonry bits are very similar to normal twist drills. However, tip is usually made from carbide steel. This is extremely tough and keeps its sharp edge even when drilling stone and brick. From time to time the tip will need grinding in order to re-sharpen the cutting edge. 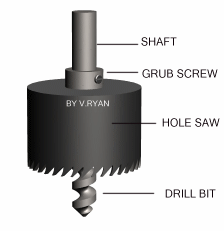 Hole Saws are used to drill large diameter holes, usually through thin wood boards. When drilling it is important to withdraw the saw/drill regularly to allow all the waste wood/chippings to escape from the hole. If this is not done the saw tends to ‘jam’. This can be dangerous. Hole saws are provided with a range of sizes of saws. The saw can be changed easily. The grub screw holds the saw firmly against the shaft of the drill bit so that it revolves at the same speed. Flat Bits are use to drill fairly large holes in wood boards and sections. They can be purchased in a range of sizes. 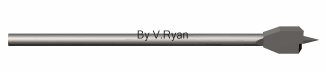 A Plug Cutter is useful for cutting reasonably large holes through wood based materials. The wood collects inside the cylinder and can be removed quite easily, giving a disc of material.  A Forsner Bit is used to cut ‘blind’ holes in wood based materials. A blind hole is one that does not go all the way through the material being drilled. 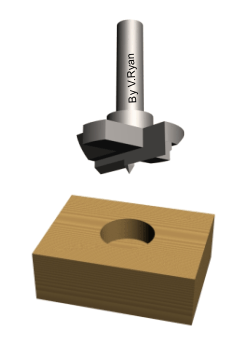 CORDLESS HAMMER DRILLS Cordless Drills are extremely popular because they are portable and yet powerful. A rechargeable battery (usually 12v to 18v) supplies the power and lasts for several hours before recharging is necessary. They are safer than corded drills because there is no cord to trip over and the voltage required is quite low compared to the 220v - 240v needed for corded drills. However, all the usual safety measures should be taken when using any drill. Although using a drill when working up a ladder should be avoided where possible, if this has to be attempted - use a cordless drill as they are lighter and do not have a trailing mains lead. Most cordless drills are powerful enough to drill even tough materials like stone and masonry. 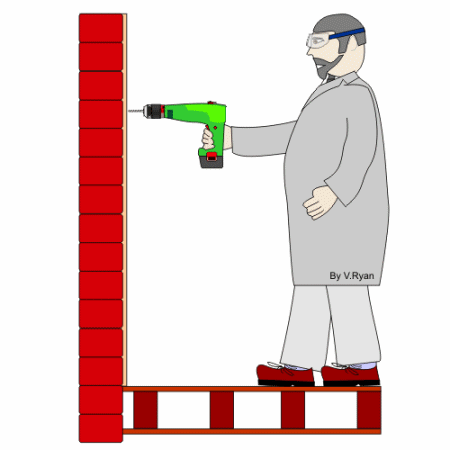 1. Always wear safety goggles to protect the eyes. Never operate equipment like this without eye protection. 2. If a front handle is supplied with the cordless drill - use it as it gives greater control over the drill. 3. The person using the drill should space their feet apart. This helps the person balance and lean into the drill, applying his/her weight safely. 4. Always check that electrical wires or water pipes are not in the area of intended drilling. Drilling through an electrical wire can be extremely dangerous. 5. Always seek instruction / training from an appropriately qualified instructor before using any tools, especially power tools. 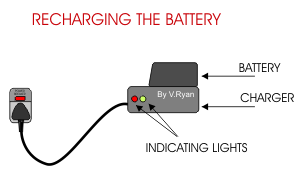 The battery can be removed from the drill by pressing the battery release button. It can then be plugged into the charger and left for approximately 3 to 5 hours. TIP: If you intend to regularly use your cordless drill for along time, buy a spare battery. This means that as one is being charged the drill can still be used. A basic cordless drill is shown below. Even basic drills are provided with accessories. A rechargeable battery and charger are also included. The battery will need recharging every 1 to 2 hours of continuous use. Cordless drills usually have a front handle that can be fitted if required. It is strongly recommended that the front handle is fitted as it provides extra support and makes it more likely that the drill will be used safely. If both hands are holding the drill then it is impossible for the user to accidentally place his /her hand in the way of the drill whilst it is in use. 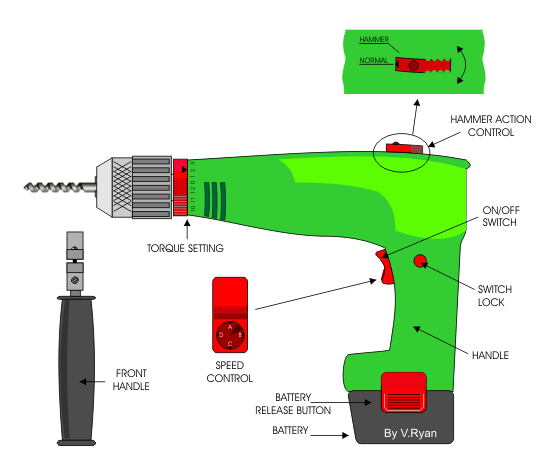 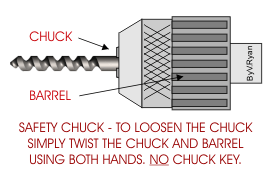 Safety / self-locking chucks are very common. These do not need a chuck key and are used by simply turning the chuck and the barrel by hand, in opposite directions. The drill bit locks in position SDS (SPECIAL DIRECT SYSTEM) DRILLS SDS (Special Direct System) Drills are extremely powerful and used when extra power is required, for heavy duty jobs. They have three basic functions that allow normal drilling, hammer action and chiselling. Furthermore, SDS Drills can hold large diameter drill bits well passed the 13mm diameter limit of normal drills. Professionals tend to select this type of drill for major projects. However, SDS Drills tend to by heavy compared to ordinary drills which means they are unsuitable when working up a ladder or for small jobs such as light drilling - when a small power drill would be suffice. 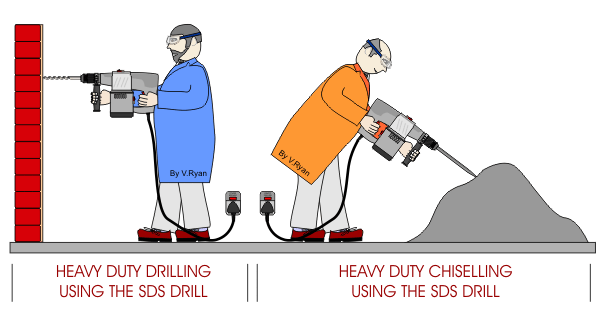 1. The cord is carefully laid out so that it cannot trip the person using the drill. 2. It is good practice to use a circuit breaker. This will cut power if any electrical fault in the drill is detected. 3. Always wear safety goggles to protect the eyes. Never operate equipment like this without eye protection. 4. When using an SDS Drill hold both the normal handle and front handle securely. This will help steady the drill as it vibrates during use. It also allows the user to put pressure against the drill as it is used to drill holes in difficult materials. 5. The person using the drill should space their feet apart. This helps the person balance and lean into the drill, applying his/her weight safely. 6. Always check that electrical wires or water pipes are not in the area of intended drilling. Drilling through an electrical wire can be extremely dangerous. 7. Always seek instruction / training from an appropriately qualified instructor before using any tools, especially power tools. A basic SDS Drill is shown below. Even basic drills are provided with necessary fitments such as a front handle. It is strongly recommended that the front handle is always fitted before use . SDS Drills should not be used in one hand, it should be firmly supported by both hands in order to take the weight. Adjustments to speed can be made by the speed control dial whilst ‘hammer’, ‘normal’ or ‘chisel action’ can be selected by altering the position of the lever at the top of the drill. 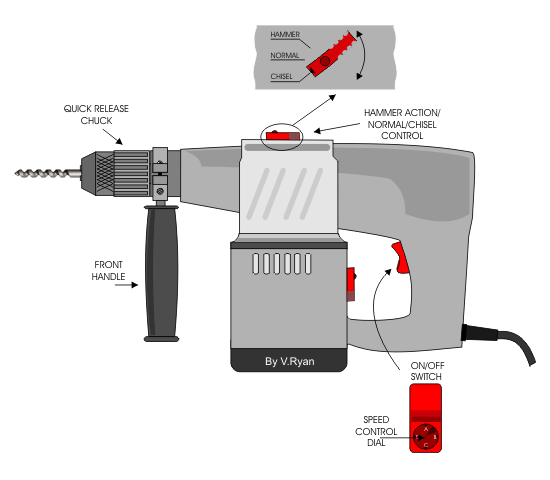 TYPICAL SDS DRILL CHISEL A range of chisels are supplied for SDS Drills. A typical chisel is shown opposite. The shaft is the part that locks into the chuck of the drill. The chisel point is ‘ground’ to a suitable angle (normally 60 degrees). This type of chisel could be used to ‘chip’ away concrete or stone. TYPICAL SDS DRILL CHISEL A range of chisels are supplied for SDS Drills. A typical chisel is shown opposite. The shaft is the part that locks into the chuck of the drill. The chisel point is ‘ground’ to a suitable angle (normally 60 degrees). This type of chisel could be used to ‘chip’ away concrete or stone.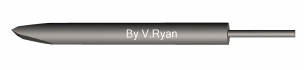 POWER SCREWDRIVERS Everyone has used a manual screw driver to turn a screw that refuses to move or one that is very difficult to turn. The result is a sore or blistered hand. Power screwdrivers are the answer especially if a large number of screws need to be fixed in position. A large range of power screwdrivers exist and even the cheapest types are often very powerful and most are supplied with a range of attachments. As a minimum a battery charger and a number of screwdriver blades will be part of the overall kit. 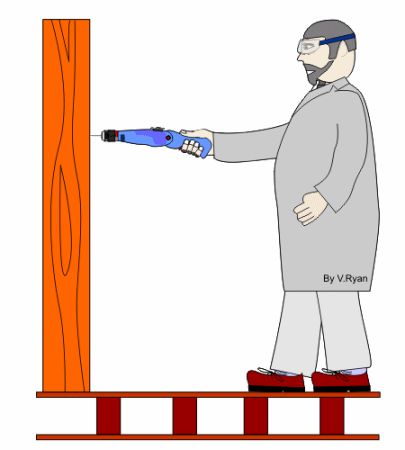 1. The screwdriver blade is dangerous. Both hands should be behind the blade whilst it is turned. Never, place a hand in front or alongside the blade. If the blade slips it can tear into flesh, producing a nasty injury. 2. Always wear safety goggles to protect the eyes. Never operate equipment like this without eye protection. 3. Select a power screwdriver with a comfortable handle. A poorly designed handle will cause blisters. 4. Use the correct screwdriver blade. Eg. a 'Crosspoint', Slot head or 'Supadriv' type. An ill fitting blade will slip as the screw is turned and can cause injury. 5. Always check that electrical wires or water pipes are not in the area. Forcing a screw into an electrical wire can be extremely dangerous. 6. Always seek instruction / training from an appropriately qualified instructor before using any tools, especially power tools. 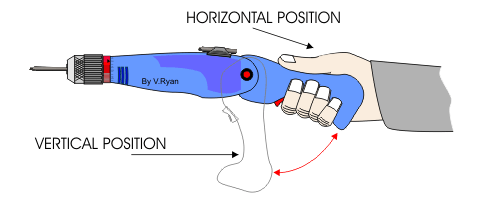 Depending on the model and make of power screwdriver, the handle will have two positions. The handle can be locked in a level position as shown in the diagram above OR it can be locked into a vertical position. Depending on the model and make of power screwdriver, the handle will have two positions. The handle can be locked in a level position as shown in the diagram above OR it can be locked into a vertical position. Power Screwdrivers are usually variable speed and torque. The example below has a speed control disc on the ON/OFF button. Pressing the top of the ON/OFF button turns the chuck and screwdriver blade in a clockwise direction. Alternatively, pressing the bottom of the ON/OFF button turns the chuck in an anti-clockwise direction. Torque is often misunderstood. Torque is the amount of power supplied to the chuck. For example. The speed (RPM) may be quite low and the chuck turns slowly - However - the torque may be high and the chuck turns powerfully and powers screws into the most resistant of materials. The torque setting can be adjusted by turning a dial (shown on the diagram below). Sometimes the setting will be set quite low. This helps prevent over tightening of a screw. 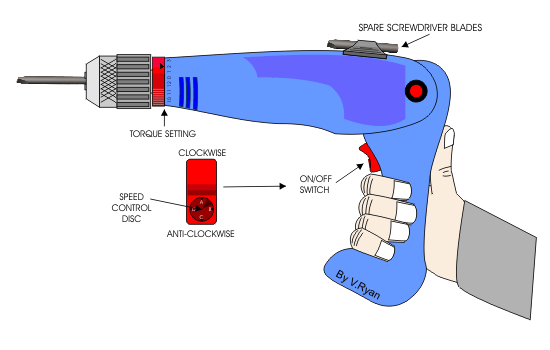 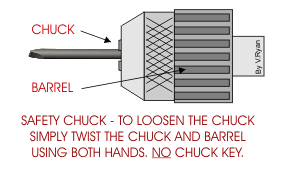 Safety / self-locking chucks are very common. These to not need a chuck key and are used by simply turning the chuck and the barrel by hand, in opposite directions. The screwdriver bit locks in position. To charge most power screwdrivers, simply plug them into the mains. On some models a red indicator light will show when the internal battery is charging. When charging is complete (1 to 3 hours) the green indicator light will show. Then the screwdriver can be disconnected from the mains and used. 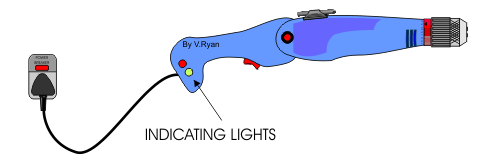 يتبع
__________________
 
|
|
#2
January 1, 2011, 03:01 PM
|
||
|
|
||
|
MACHINE PLANERS When the width or thickness of a piece of wood needs reducing by a small amount, a plane is normally used. However, if a large amount of wood needs removing or the piece is very long, using a smoothing plane or jack plane is time consuming and can be inaccurate. The best option is to use a machine plane. These are relatively cheap and save time and effort. 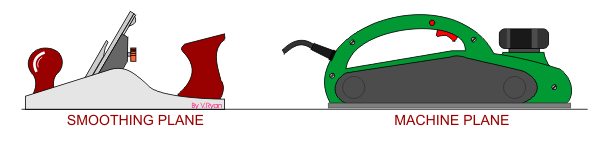  1. Always plug power tools into a RCB (circuit breaker) as a safety measure against electrical faults. 2. Wear goggles to protect eyes from ‘chippings’ and a face/dust mask to prevent breathing in dangerous dust particles. 3. Always read the manufacturers instructions very carefully and follow them. 4. Always seek instruction / training from an appropriately qualified instructor before using any tools, especially power tools. 5. Make sure that the mains cable cannot be tripped over or that it causes a hazard in anyway. 6. Secure the material to be planed in a woodworkers or similar vice. 7. Fit an extraction bag to the planer. This will collect most of the dust and chippings. The machine plane seen below has cutters that revolve at 1800 rpm (revolutions per minute). This makes it suitable for most woods. It has four cutters mounted on a rotating drum (see diagram B). Always hold the plane with two hands. NEVER use the plane with one hand as it is very easy to push it over the fingers of the second hand. This would result in a very serious injury. NEVER steady the wood to be planed in one hand whilst controlling the plane with the other. A serious accident is inevitable. Only use a machine plane with a dust collection bag fitted. 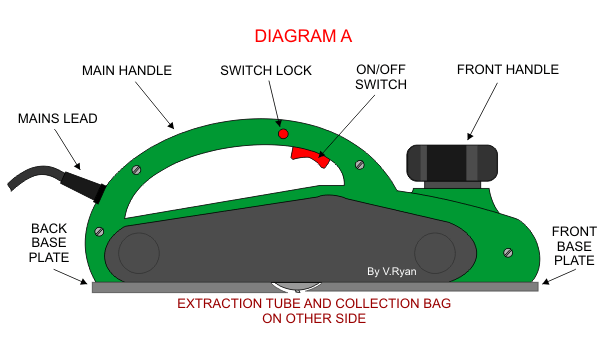 The rotating drum (shown in slow motion) and its four cutters are seen in the sectional view shown below. The drum and cutters rotate in an anticlockwise direction. The plane is pushed in the direction of the arrows - this is the safest way to operate the plane. The height of the front base plate can be adjusted so that more or less material can be planed from the wood.  SHEET SANDERS Sheet sanders are used to sand / smooth wood surfaces although they can be used to sand / smooth materials such as plastics and ****ls as well. When sanding wood, glasspaper is ‘clipped’ into the sheet sander. If the surface requires a lot of sanding then start with ‘coarse’ glasspaper rather than fine - as this will reduce the amount of time required. Fine glasspaper can be used to finish the surface so that it is smooth to touch. When in use the rectangular base vibrates at 1200 rpm (revolutions per minute). This ‘sands’ the surface of any material beneath it. 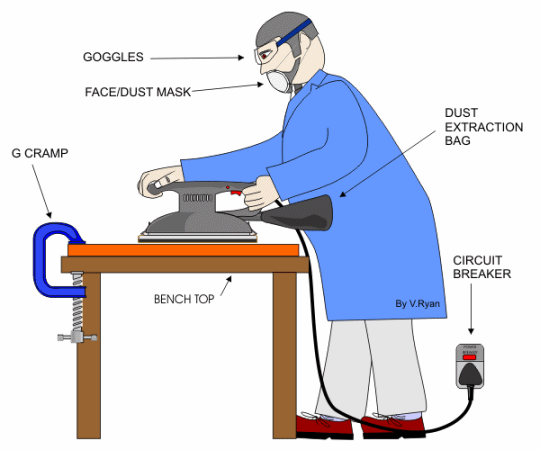 1. Always plug power tools into a RCB (circuit breaker) as a safety measure against electrical faults. 1. Always plug power tools into a RCB (circuit breaker) as a safety measure against electrical faults.2. Wear goggles to protect eyes from dust/chippings and a face/dust mask to prevent breathing in dangerous dust particles. 3. Always read the manufacturers instructions very carefully and follow them. 4. Always seek instruction / training from an appropriately qualified instructor before using any tools, especially power tools. 5. Make sure that the mains cable cannot be tripped over or that it causes a hazard in anyway. 6. G Cramp the material to be sanded to a firm workbench before starting. 7. Fit an extraction bag to the sheet sander. This will collect most of the dust. SHEET SANDER AND GLASSPAPER A large range of sheet sanders are available from DIY stores and catalogues. When selecting a sander ensure that it is provided with a dust extraction bag system and always plug into a RCB (circuit breaker). Modern, cheap sanders are usually good quality but if you intend to carry out a lot of sanding invest in a more expensive and better quality version. 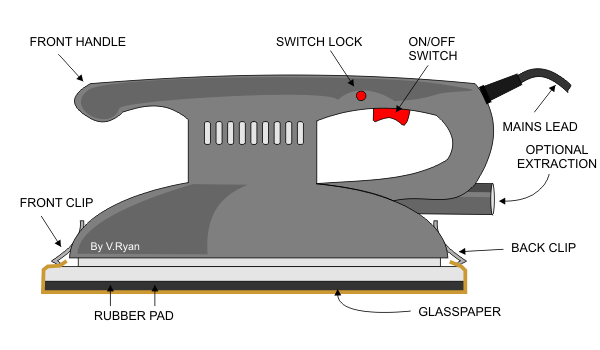 REPLACING THE GLASS PAPER 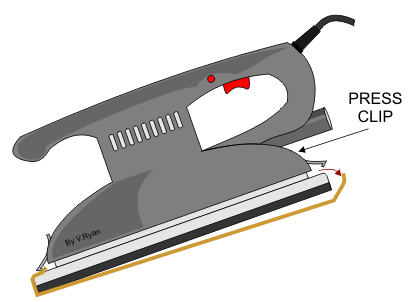 To replace worn glasspaper, press the clip at the back of the sander and pull out the glasspaper. Do exactly the same with the front clip. Clip fresh glass paper in position. Glasspaper is manufactured from crushed glass glued to a suitable backing such as cloth or paper. People often call glasspaper ‘sandpaper’. However, the last people to make sandpaper were the Egyptians, over 4000 years ago. The various grades of glasspaper are shown below: VERY FINEFINEMEDIUMCOARSEFlour2/0, 0, 11, F.2, m.2S.2, 2, 3 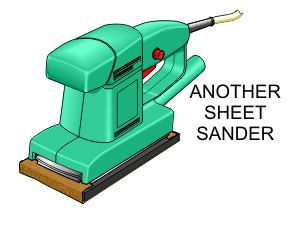 PALM SANDERS Palm sanders are extremely useful tools and they fit into the palm of one hand comfortably. They are relatively light, easy to control and cheap. The glasspaper sheet is normally fixed to the pad with velcro and this means that it can be replaced easily. Because they are quite small and have a ‘triangular’ shape to the pad, they can be used to sand into corners. For example, the diagram below shows how the sander can be used in the 90 degree corner of a door panel. 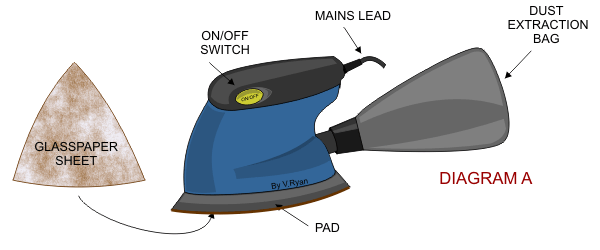 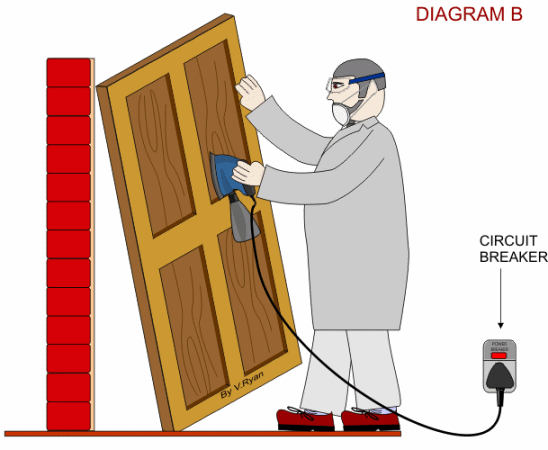 SAFE USE OF PALM SANDERS 1. Always plug power tools into a RCB (circuit breaker) as a safety measure against electrical faults. 2. Wear goggles to protect eyes from dust and a face/dust mask to prevent breathing in dangerous dust particles. 3. Always read the manufacturers instructions very carefully and follow the written instructions. 4. Always seek instruction / training from an appropriately qualified instructor before using any tools, especially power tools. 5. Make sure that the mains cable cannot be tripped over or that it causes a hazzard in anyway. 6. G Cramp the material to be sanded (where possible) to a firm workbench before starting sanding. 7. Fit an extraction bag to the palm sander. This will collect most of the dust. MACHINE ROUTERS Machine routers are extremely versatile machines. They are generally used to cut grooves in natural wood and manmade boards. They have a cutter that rotates at high speed - as the operator pushes the router forwards the cutter removes the wood in its path. They can be very dangerous if not used with care and attention to safety rules. 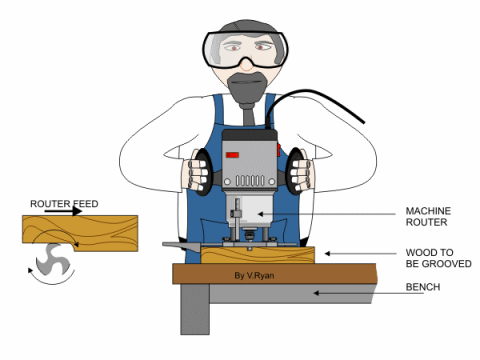 1. The mains electric cord is carried over the shoulder of the operator so that it does not get in the way of the router as it is pushed forward. 1. The mains electric cord is carried over the shoulder of the operator so that it does not get in the way of the router as it is pushed forward.2. It is good practice to use a circuit breaker. This will cut power if any electrical fault in the router is detected. 3. Always wear safety goggles to protect the eyes. Never operate equipment like this without eye protection. Wear a face mask to prevent breathing in the dust that is created. 4. Hold both handles when using the router. It is possible to switch the router on/off with the thumb of the left hand (see example above). 5. Push the router forward slowly. Look carefully at the diagram shown above - this shows the direction to move router. If this is done incorrectly, the wood will be pulled into the cutter rapidly. This can be very dangerous and it will also damage the wood being worked on. 6. Always seek instruction / training from an appropriately qualified instructor before using any tools, especially power tools. The diagram below shows a typical machine router. A wide range of cutters are available and they are fitted in the collet, using a couple of small spanners. 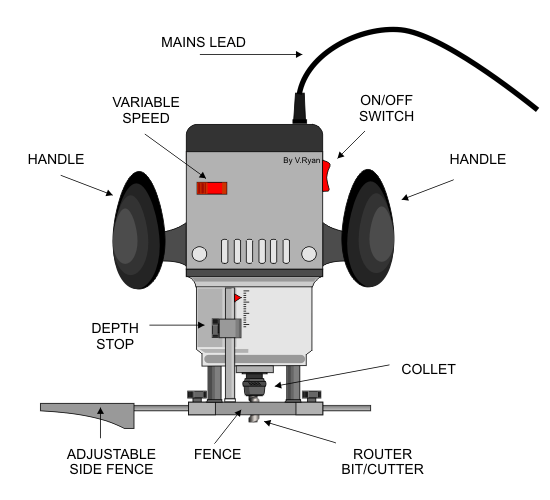 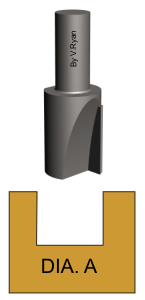 Diagram A and B show the same typical plain router bit. The router bit has two hardened steel cutters, ground to an angle of approximately 30 degrees. As they rotate they remove the waste wood. Sometimes a bearing will be fitted to the router bit (DIA. B). This is normally done when the outside edge of a piece of wood is to be rebated or a mould applied to the edge. 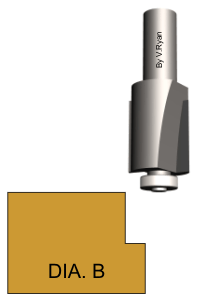 JIGSAWS Jigsaws are general cutting and shaping tools. They are provided with a selection of blades suitable for cutting and shaping a range of materials. They are ideal for cutting thin manmade boards such as plywood and MDF and they are capable of cutting detailed curves. They can also be used to cut kitchen tops and quite thick material. Thin material (4mm to 6mm) can be cut quite quickly but great care must be taken when cutting thicker material (6mm upwards). Safety and use of jigsaws are outlined below. Remember, before operating any power tools you must receive training from a suitably qualified instructor. 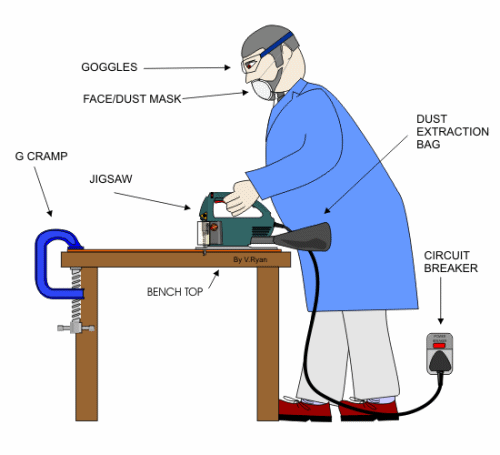 1. Always plug power tools into a RCB (circuit breaker) as a safety measure against electrical faults. 1. Always plug power tools into a RCB (circuit breaker) as a safety measure against electrical faults.2. Wear goggles to protect eyes from dust/chippings and a face/dust mask to prevent breathing in dangerous dust particles. 3. Always read the manufacturers instructions very carefully and follow them. 4. Always seek instruction / training from an appropriately qualified instructor before using any tools, especially power tools. 5. Make sure that the mains cable cannot be tripped over or that it causes a hazard in anyway. 6. G Cramp the material to be cut/shaped to a firm workbench before starting. 7. Fit an extraction bag to the jigsaw. This will collect most of the dust. 8. Use the guard at all times. Below is a typical jigsaw. The ON/OFF switch is located on the handle as well as the switch lock. When the switch is pressed the jigsaw starts although holding the switch in position whilst cutting can be uncomfortable. However, if the switch lock is also pressed this holds the switch in position which means that finger pressure on the switch can be released and the jigsaw continues to work. Two speed adjustments are seen on this model of jigsaw. They alter the speed at which the blade moves up and down. The speed of the blade is determined by the type of material being cut. Usually a jigsaw will be proved with a table of speeds relating to materials. 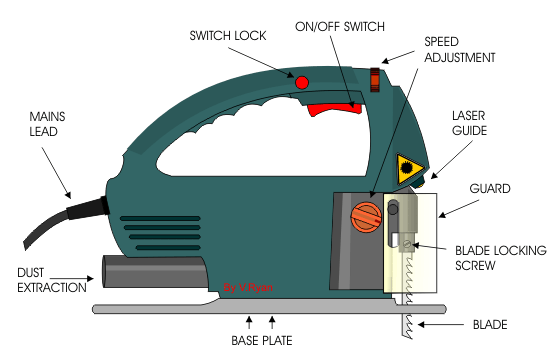  A selection of blades can be fitted to a jigsaw. The type of blade depends on the material. Furthermore, coarse blades with ‘rugged’ teeth are normally used to make rough cuts whilst blades with fine, numerous teeth are used to cut and shape very accurately. For example, cutting an accurate and smooth curve in MDF will mean that a fine blade with at least 21 teeth per inch (TPI) will be fitted. To fit the blade the guard is moved back and usually a screwdriver is used to loosen the blade locking screw. The blade can then be removed and replaced. More modern jigsaws have quick release mechanisms that allow very quick replacement of blades. يتبع
__________________
|
|
#3
January 1, 2011, 03:10 PM
|
||
|
|
||
|
FURTHER USE OF A JIGSAW 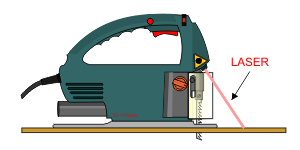 A laser guide is quite common on jigsaws and other power tools. The laser is a precise beam of light that shines accurately in front of the jigsaw. This can be used as a guide which shows exactly where the jigsaw blade is to cut. Remember, lasers are dangerous and the light should never be shined directly into eyes. 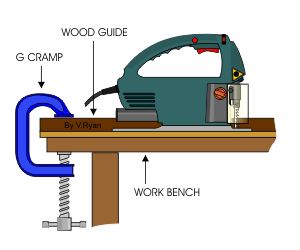 If the wood to be cut and a wood guide is G Cramped to a work bench it will be possible to cut in a straight and accurate line. The jigsaw is pressed against the guide whilst been pushed in the direction of the cut. Wood guides are very useful and they are safe if used properly. 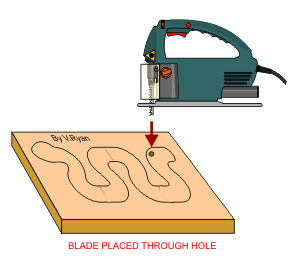 When cutting an internal shape a hole must first be drilled so that the jigsaw blade can fit inside the shape. The jigsaw can then follow the line round the shape. For this type of work a fine blade is used so that the finished cut is smooth and accurate. 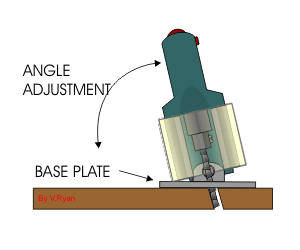 The base plate of the jigsaw can be adjusted so that an angle of up to 45 degrees can be achieved. The jigsaw becomes more difficult to handle when set at an angle. Also, the angle may need to be finished with a smoothing plane to remove the rough surface HAND HELD CIRCULAR SAWS Circular saws are used for cutting woods to size . They are extremely powerful and dangerous if used incorrectly. They are ideal for cutting manmade boards such as plywood and MDF and natural woods up to a size of approximately 30mm thickness. They can be used to cut kitchen tops and materials for furniture and windows. They are a necessary piece of equipment for heavy joinery work. They must be used safely as an accident with this type of equipment can be very serious. The safe use of circular saws are outlined below. Remember, before operating any power tools you must receive training from a suitably qualified instructor. 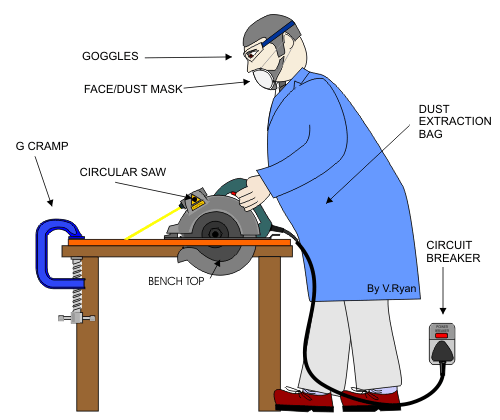 1. Always plug power tools into a RCB (circuit breaker) as a safety measure against electrical faults. 1. Always plug power tools into a RCB (circuit breaker) as a safety measure against electrical faults.2. Wear goggles to protect eyes from dust/chippings and a face/dust mask to prevent breathing in dangerous dust particles. 3. Always read the manufacturers instructions very carefully and follow them. 4. Always seek instruction / training from an appropriately qualified instructor before using any tools, especially power tools. 5. Make sure that the mains cable cannot be tripped over or that it causes a hazard in anyway. 6. G Cramp the material to be cut/shaped to a firm workbench before starting. 7. Fit an extraction bag to the circular saw if one is available. This will collect most of the dust. 8. Keep hands and fingers away from the rotating blade. 9. Before plugging in to the mains, check the condition of the blade. Do not use the saw if the blade looks damaged or worn. A basic hand held circular saw is shown below. Most circular saws have a laser to help the operator guide the saw accurately, in the chosen direction. The retractable guard helps cover the rotating blade so that hands and fingers are relatively safe. The base plate rests on the material to be cut and can be altered to give a variety of angles (normally 90 to 45 degrees). Whilst in use, if the switch lock is pressed, the trigger finger can be removed from the ON/OFF switch and the blade will still rotate and cut. This makes the circular saw more comfortable to use. 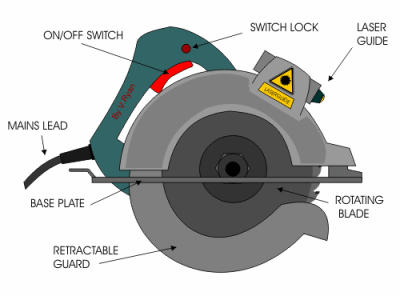 Circular saws are possibly the most dangerous power tool of them all. Never use one until you have received proper instruction from a suitably qualified person. Circular saws are possibly the most dangerous power tool of them all. Never use one until you have received proper instruction from a suitably qualified person.1. The circular saw is normally used for heavy and substantial work where ‘thick’ materials are being used. It is advisable to use lighter tools such as jigsaws for less heavy work - this is a safer option. 2. Inspect the wood to be cut very carefully especially if the material is second hand. Remove nails and screws from the material before cutting with a circular saw. Potentially serious accidents can take place if the rotating blade of a circular saw hits a steel screw or nail. 3. Never use the circular saw with one hand and rest the other in front or at the side of the saw. A circular saw will cut through flesh and bone quickly. Keep hands and fingers well away from the blade. It is advisable to control the circular saw with both hands. This keeps the saw under control and at the same time keeps hands and fingers away from the rotating blade. 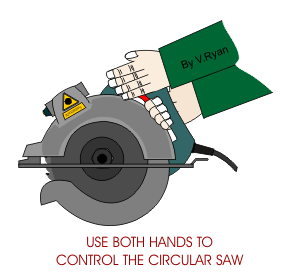 TABLE - CIRCULAR SAWS Table circular saws are used for cutting woods to size . They are extremely powerful and dangerous if used incorrectly. DIY table circular saws are ideal for cutting manmade boards such as plywood and MDF and natural woods up to a size of approximately 50mm thickness. They can be used to cut materials for joinery, furniture and windows. A table circular saw is normally supplied with a floor stand and this lifts the saw up to a safe working height. Saws of this type are a necessary piece of equipment for heavy joinery work. The safe use of table circular saws are outlined below. Remember, before operating any power tools you must receive training from a suitably qualified instructor. They must be used safely as an accident with this type of equipment can be very serious. 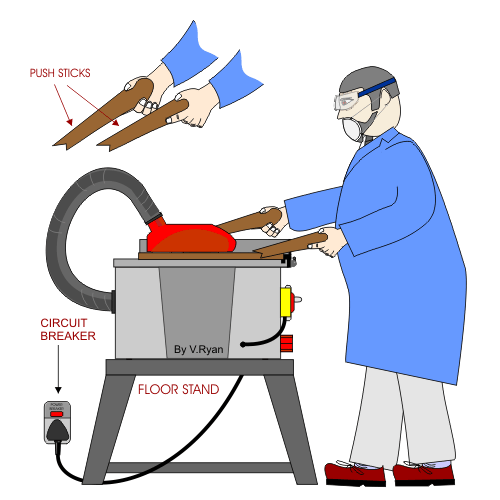 1. Always plug power tools into a RCB (circuit breaker) as a safety measure against electrical faults. 1. Always plug power tools into a RCB (circuit breaker) as a safety measure against electrical faults.2. Wear goggles to protect eyes from dust/chippings and a face/dust mask to prevent breathing in dangerous dust particles. 3. Always read the manufacturers instructions very carefully and follow them. 4. Always seek instruction / training from an appropriately qualified instructor before using any tools, especially power tools. 5. Make sure that the mains cable cannot be tripped over or that it causes a hazard in anyway. 6. Use push sticks so that hands and fingers are kept away from the dangerous rotating blade. 7. Fit an extraction unit to remove all the dust and small practicals. 8. Keep hands and fingers away from the rotating blade. 9. Before plugging in to the mains, check the condition of the blade. Do not use the saw if the blade looks damaged or worn. 10. Check the condition of the wood to be cut especially if it is recycled. Look out for nails and screws. if these are hit be the rotating blade the wood can be thrown out of the machine at great speed. The blade will also be damaged. 11. Turn off all power to the saw when changing a blade or carrying out maintenance. 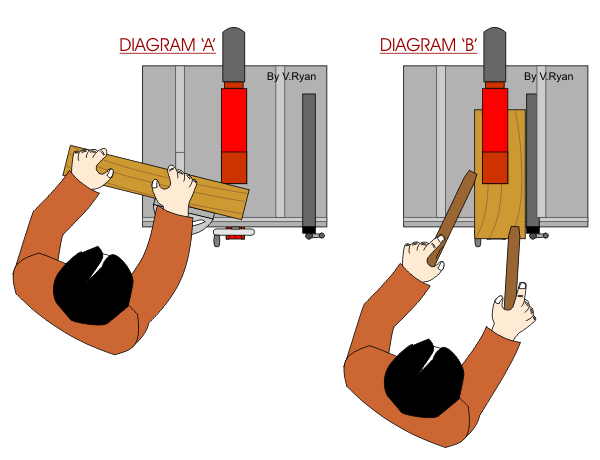 Diagram ‘A’ shows the mitre guide being used. This allows the wood being machined to be cut accurately at a set angle. The mitre guide can be set to a range of angles. This is a useful, simple accessory. Diagram ‘A’ shows the mitre guide being used. This allows the wood being machined to be cut accurately at a set angle. The mitre guide can be set to a range of angles. This is a useful, simple accessory. Diagram ‘B’ shows push sticks being used. They are used to push / guide the wood along the fence and towards the rotating blade. Push sticks must always be used if the operators hands move too close to the circular saw. The distance between the fence and blade can be set to different distances allowing for a range of widths of material to be cut TABLE CIRCULAR SAWS - QUESTIONS QUESTIONS: 1. Draw either a two or three dimensional view of a typical table saw. 2. Label the diagram. 3. Describe as many safety factors as possible regarding the use and maintenance of the saw. 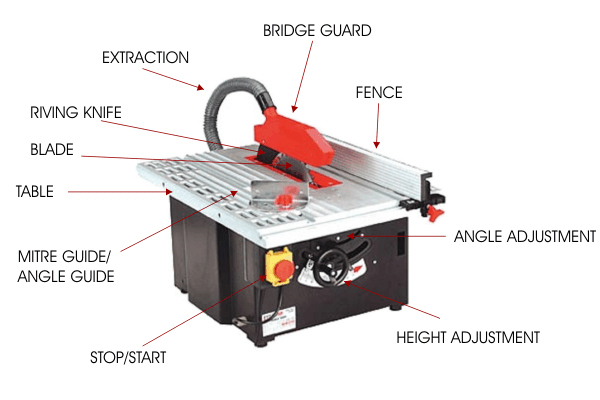  انتهي
بالتوفيق للجميع copied
__________________
|
|
| مواقع النشر (المفضلة) |
| أدوات الموضوع | |
| انواع عرض الموضوع | |
|
|
 المواضيع المتشابهه
|
||||
| الموضوع | كاتب الموضوع | المنتدى | مشاركات | آخر مشاركة |
| طريقة عمل الحلويات الشاميه بالصور،حلويات العيد السوريه بالصور،اشهى حلويات العيد | AHD Ashour | وصفات الحلويات والعصائر و الآيسكريم | 4 | October 29, 2012 12:47 AM |
| حلويات العيد،حلويات العيد بالصور،كيكات العيد بالصور،طريقة عمل اشهى الحلويات تشيز كيك | AHD Ashour | وصفات الحلويات والعصائر و الآيسكريم | 4 | March 9, 2012 12:21 AM |
| انواع المعمول بالصور،ملف كامل معمول العيد،طريقة عمل اشكال للمعمول العيد بالصور | AHD Ashour | وصفات الحلويات والعصائر و الآيسكريم | 3 | November 3, 2011 01:54 PM |
| معمول العيد بالصور،كعك العيد،طريقة عمل المعمول بالصور | AHD Ashour | وصفات الحلويات والعصائر و الآيسكريم | 1 | December 31, 2009 03:49 AM |
| طريقة عمل كعك العيد بالصور،كعك العيد بالصور،خطوات عمل كعك العيد بالصور | AHD Ashour | وصفات الحلويات والعصائر و الآيسكريم | 1 | December 31, 2009 03:47 AM |


 العرض العادي


